Mei Tai Ring Sling

Step by step instructions to assemble a Mei Tai Ring Sling.

This is default featured slide 2 title

Go to Blogger edit html and find these sentences.Now replace these sentences with your own descriptions.

This is default featured slide 3 title

Go to Blogger edit html and find these sentences.Now replace these sentences with your own descriptions.

This is default featured slide 4 title

Go to Blogger edit html and find these sentences.Now replace these sentences with your own descriptions.

This is default featured slide 5 title

Go to Blogger edit html and find these sentences.Now replace these sentences with your own descriptions.

Saturday, February 16, 2013

Guest Blogger: Ring Tai Tutorial (a Mei Tai with rings!)

Hello friends, this is my first guest blogger post! I was trying to decide which baby carrier to make first and came across this Ring Tai on the DIY Babywearing page on Facebook (check it out, but warning it's addictive!  You will feel the need to make and try EVERY carrier you see on that page!)  Heidi Imel laid out very clear instructions on how she assembled her Ring Tai and gave me permission to repost them here. Thanks Heidi!

First lay out your supplies.  There are some missing photos of the supplies but easy to assemble these.  All dimensions below are raw dimensions unless specified.

  1. (2) shoulder straps 10" tall (8" finished) X at least 37" long.  If you want to know exactly how long you will need your straps (I am a larger woman than Heidi so I wanted to make sure mine were long enough) measure from your shoulder blade over your shoulder and under your arm to that same point and double it.  My measurement is 42" plus add to that a 5" seam allowance for the part of the strap that stays inside the carrier body. (photo later)  So I cut my straps 10" X 47". Hem both long edges and one short edge, the other short edge can be left raw as it will be hidden inside the body of the carrier.
  2. (1) waist strap 10" tall (8" finished) X your waist measurement.  Mine is 40".  Hem both long edges and one short edge, the other short edge can be left raw as it will be hidden inside the body of the carrier.
  3. (3) straps for the rings 10" X 7"
  4. 3 sets of small rings from Slingrings.com
  5. (1) beautiful woven wrap or 100% cotton tablecloth!

Now that you have all the pieces collected, let's start assembling!  We will start with the 3 straps for the rings.
3 sets of small slingrings
  Now grab the (3) 10" x 7" pieces you cut.
Fold one side over (about in thirds) then for the right side, see how I fold the raw edge of the yellow over? That is going to seal in the raw edge.

Then fold the right side over the left side, pin, and press.

Stitch along the fold to seal it all together.  The short edges can be left raw, they will be inside the carrier body.

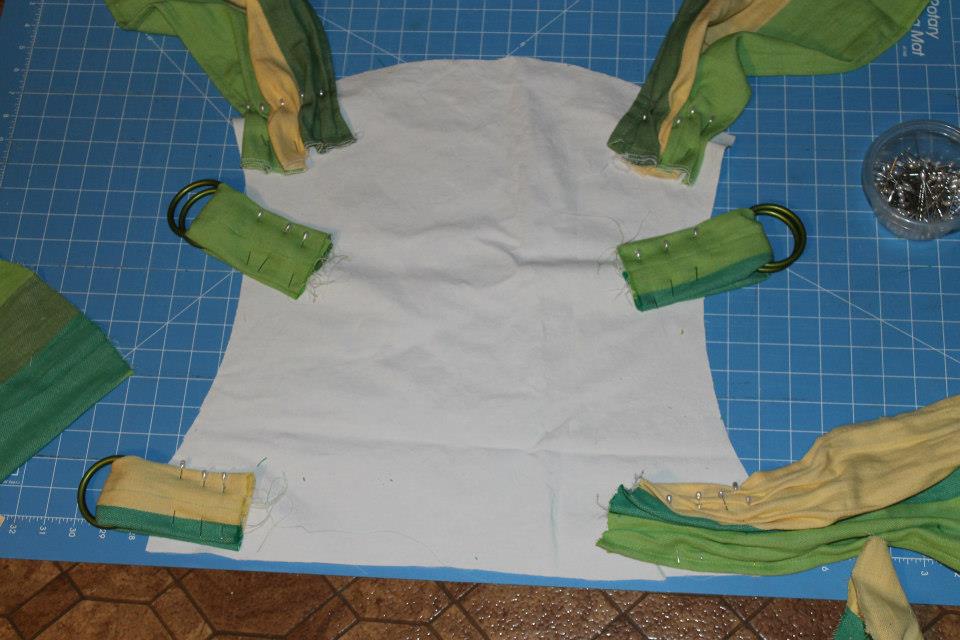
Put 1 set of rings on each sewn strip.  Fold in half around the rings with the seam toward the inside and pin together.
Set these aside for a bit while we switch to the body of the carrier.
I cut out 2 body pieces of my wrap, this exact shape (not pictured). Here is my inner layer of duck canvas for all my "safety sewing"---this is 1" smaller than the outer body panels. The smaller inner later will allow it to fit inside without bunching up.


Pin your waist ring piece to one side, gather the raw end of the waist strap and pin it with a 3-4" space for X-boxes on the inside. Pin the ring pieces (I prefer a slight angle upwards) about 7" above the waist pieces--this will leave enough room for chunky baby thighs but wont be so high that they'll dip in arm pits or be hard to thread the rings.

I'm assuming anyone who will make this (or any) carrier knows about back tacking and triple stitching---I used black polyester Gutterman thread so you can see my X-Boxes. I stitched X-Boxes at each strap/ring attachment point. I went over each X twice and they are intentionally not sewn directly on top of one another-that can weaken the fabric. Stitching doesn't have to be perfectly straight or pleasing to the eye, just safe, because its on the inside of the carrier. :)

Close up of a couple X-boxes.

With right sides together, pin your 2 body pieces together, making note of the entrance points of the ring straps and shoulder straps. (I suggest laying the inner layer on top of the body pieces BEFORE they are stitched together and using a pen to mark where the holes need to be.) I left a 1/3-1/2" seam allowance. Sew the pieces together at all sides EXCEPT at the strap/ring piece points--see next picture for example.

Here is an opening I left for the waist strap.

Here is an opening I left for a side ring strap.

Carefully feed your inner canvas layer between the body layers, threading the straps through the openings (I used the widest opening at one of the shoulder straps points to feed my whole piece) then pull each strap/ring piece through it's proper opening. Carefully smoosh everything into place, flattening the inner layer and making sure its all lined up and the inner layer edges match up with the "slip cover" edges. (A flat yard stick comes in handy here!) Pin.

Top stitch around the whole carrier, folding under all the raw edges of the strap/ring pieces openings. I'll add some action shots as well!


Thank you, Heidi, I can't wait to get started as soon as my rings get here!  I will post my finished product, friends, please feel free to post yours!  As always take extra care when sewing your carriers, you will be carrying precious cargo and I take no responsibility for anyone's stitching but my own!  Happy sewing!

Friday, February 15, 2013

I'm Back! (Kind of)

Hello, Friends, it's me.  After a considerable amount of time dormant, I think I am ready to venture into the world of blogging again.  I have a lot of things on my plate that need said and celebrated and I forgot I had a platform upon which to celebrate them!  My loving husband got me a new sewing machine and I promptly set forth to stitch up a couple flannel fitted cloth diapers.  It went better than I expected.  With a trip to Alaska looming, I am turning my thoughts to a baby carrier that can hold my hefty son comfortably for hours.  Should I try the TCMT (tablecloth mei tai) or an Onbuhimo or Podegi?  So many options...I'll get back to you on that!


Monday, October 24, 2011

It's a BOY!!!

eBabyShowerGames.com myspace graphic comments


The cake was BLUE, that means we are having a BOY! Andrew was kinda hoping for a little princess but I guess I get MY little prince first. Once Little Gabriel Thomas is here, we will both be head over heels in love (with each little kick, I am ALREADY in love.)  It is a little harder for daddies cuz they can't feel all the little flutters but all that changes once that precious little boy is in our arms.  I for one, can NOT wait.  I am 23 weeks, that means 3 1/2 LONG months to go!  How will I ever make it? =D

Saturday, April 16, 2011

My Little Sis..


Still got 'yer back Bea... now and always!

Thursday, April 7, 2011

I Raise My Eyes to the Hills, Where Does My Help Come From

My Help Comes From the LORD.


You ever have one of those days? Everywhere you turn, someone is handing you something else to do, to handle, so THEY don't have to?  That was yesterday for me.  I found out that 2 more of my co-workers (yes two MORE) are leaving, meaning by the end of this month, we will be short 5 persons in our advertising group.  As I told my husband last night, "Everyone is jumping ship and I'm left holding the oars."  Well I only have 2 hands, I can't hold all 5 oars that have been abandoned (read that as, ordering advertising for 150+ accounts in each of the 4 abandoned account blocks).  So last night I was VERY discouraged.  So my husband bought me Chinese food (meaning I didn't have to ALSO worry about what to cook-Bless you Honey!) and listened to my tale of woe, let me cry it out and started offering solutions.  It makes me so glad to have a husband.  God knew that as a woman, my response to such times is to relieve stress by letting my emotion drip out of my eyes.  It makes ME feel better, but does not really DO much to get me OUT of the situation.  God instilled in MAN the drive to fix things, to get it done, to move ahead, to get the family where they are going. Thank you God!

So this morning, I already feel much better and on the radio this morning played one of my favorite life-got-you-down? songs Voice of Truth-by Casting Crowns and I wanted to hear it again, so I found it on YouTube and whoever put together this collage, did a good job.  And at the end are verses that spoke to me so well, I wanted to share them.

John 14:27
"Peace I leave with you; my peace I give you. I do not give to you as the world gives. Do not let your hearts be troubled and do not be afraid."

This one is the New Living Translation (which I don't always agree with) but this time it used perfect wording:

Deuteronomy 31:6
"So be strong and courageous! Do not be afraid and do not panic before them. For the Lord your God will personally go ahead of you. He will neither fail you nor abandon you "

As long as I have God and my husband with me, I will keep putting one foot in front of the other and soon I will walk out of the valley and bask in the Son-light.


Tuesday, March 22, 2011

Kate Quotes

I spent most of yesterday and today with my niece Katelyn.  And today she delighted us several times. It was a treat!  I have included a conversation she had with Papa (Grandpa) while we trekked through the countryside around Norwalk (looking for the car hospital for Auntie B's car) and were finally on our way home.  Then, below that, is Katelyn showing Papa how to play Hide the Ball (the Ball Game).  Such a delight.

Kate: Where are we going?
Papa:  I think we are going back to Grandma's house.
Kate: Auntie B, are we going to Grandma's house?
Aunti B: Yes.
Kate: (to re-assure Papa) she said Yes, we are going to Grandma's house!

Papa you can rest easy, I talked to the source and she says we are going back to your house.  Classic.


Tuesday, March 15, 2011

Cribbage anyone?


Andrew and I spent the weekend up in Minneapolis for the Twin Cities Auto Show and spent a lovely afternoon with Larry & Carol.  They taught us (or reminded us, I guess) how to play cribbage.  It was so much fun-Andrew won, grinning like a Cheshire Cat the whole time.  (He looked so cute, it softened the blow of losing CONSIDERABLY!)  So now it is time to practice...a LOT!!